SAT2CHART works in conjunction with Google Earth, SASPlanet or OpenCPN to create georeferenced charts in various formats, including KAP. These charts can be used is various software applications that have mapping and geo-referencing features, including VideoRay’s Mission Specialist Greensea IQ control software.
SAT2CHART, Google Earth, SASPlanet and OpenCPN are comprehensive programs with features for creating charts for navigation beyond the scope of this guide. There are many tutorials for using these programs online from novice through expert levels. The instructions provided herein are general, but should satisfy the majority of the requirements for typical VideoRay Mission Specialist ROV applications using Greensea IQ control software.
Since SAT2CHART is a Microsoft Windows-based program, a separate Windows PC will be required to create and import charts to Mission Specialist systems using Ubuntu. Chart files can be copied and pasted into the VideoRay system computer’s ‘Charts’ folder using a portable drive. The Windows PC that created the files will not be needed in the field.
Downloads
The link below will take you to a page containing a significant amount of information, instructions, and links. It is highly recommended that the instructions are followed carefully for a successful outcome.
https://svsoggypaws.com/Sat2Chart/index.htm
For a simpler procedure, the necessary downloads are linked below, then read the instructions that follow below.
Install one or both of the mapping programs below:
The above links are managed by their respective providers. We do our best to keep these links up-to-date, but if they do not work, conduct an internet search to locate and download the requirements. If you have questions or need assistance, please contact support@videoray.com.
Installation
Once your files have been downloaded, extract if prompted and execute each program in the order listed above to complete the installation. Select the default prompts during the installations.
Follow the instructions in the Readme.html file for configuring Google Earth to satisfy SAT2CHART’s requirements. In general, you can ignore the configuration items indicated as optional.
Creating Charts Using SASPlanet (Recommended)
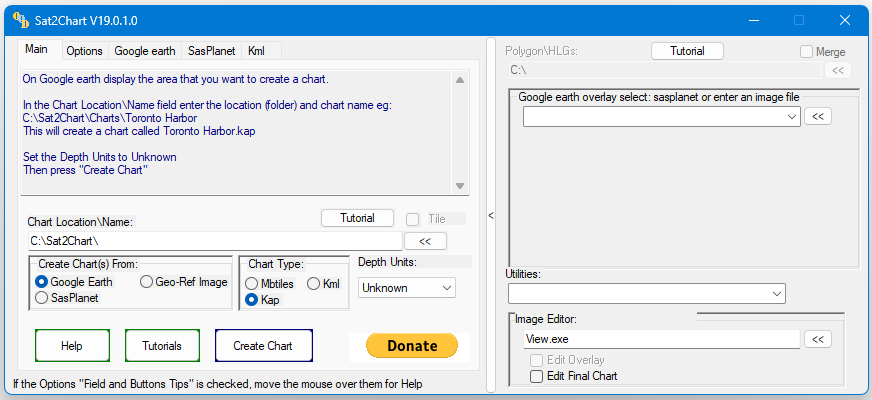
- Launch Sat2Chat from the Windows Start Menu or desktop icon. If this is your first time using SAT2CHART, viewing the tutorial is recommended.
- Select SASPlanet from the ‘Create Chart(s) From:’ in the lower left section of the window.

- Launch SASPlanet by navigating to the folder where you installed it and open it.
- After SASPlanet starts, navigate to the desired area for the chart you intend to create. Zoom in as far as possible while still keeping the perimeter of the area in your view to get the best resolution for your chart.
- Return to SAT2CHART.
- Enter a folder name and file name for the chart to be created in the “Chart Location\Name:” field. The folder must exist, but the chart file name does not need to exist. If the chart file name exists, you will be asked whether to overwrite it or not.
- Click on the ‘Create Chart’ button.
- When the chart is created,, you can preview it by selecting the ‘View Chart’ button.
- The chart will be created as a .KAP file in the folder you specified.
- Close SAT2CHART and SASPlanet.
Creating Charts Using Google Earth
- Launch SAT2CHART from the Windows Start Menu or desktop icon. If this is your first time using SAT2CHART, viewing the tutorial is recommended.
- Select Google Earth from the ‘Create Chart(s) From:’ in the lower left section of the window.
- Open Google Earth and navigate to the desired area for the chart you intend to create. Zoom in as far as possible while still keeping the perimeter of the area in your view to get the best resolution for your chart. Ensure your grid is visible and that a minimum of two grid squares are visible. The Readme.html file has additional criteria / requirements for selecting the area of your chart. You must adhere to these requirements.
- Return to SAT2CHART.
- Enter a folder name and file name for the chart to be created in the ‘Chart Location\Name:’ field. The folder must exist, but the chart file name does not need to exist. If the chart file name exists, you will be asked whether to overwrite it or not.
- Click on the ‘Create Chart’ button.
- When the chart is created, you can preview it by selecting the ‘View Chart’ button.
- The chart will be created as a .KAP file in the folder you specified.
- Close SAT2CHART and Google Earth.
Your chart can be found in the folder and name you specified. The file can be copied to the VideoRay controller computer by copying to an external drive from the Windows PC and pasting it into the ‘Charts’ folder of the Ubuntu Home directory.
Open the Greensea IQ UI and access the ‘Navigation’ menu, then select the desired chart file to be imported. The georeferenced chart should now be displayed on the Map view. If it is not, ensure you have acquired positioning with the ROV or topside GPS/GNSS receiver and are physically within the chart’s perimeter.
File Organization
If you are going to be creating charts on a regular basis, you may want to create a folder on your PC desktop named ‘Charts’. You can then create project folders within this folder to help keep your charts organized.