This is an introduction and overview of drop rigging and procedures for deep dives. This configuration is designed for saltwater applications, as a Galvanic Timed Release (GTR) device will not corrode in fresh water. When rigging in freshwater applications, the GTR may omitted from the configuration.
Please contact the VideoRay Support team with questions or further information when following these steps.
PREPARATION
Collect the following components:
- 35lb kettlebell
- Paracord
- Galvanic Timed Release (GTR) device
- Zip-tie
- Wire rope (8ft), with loops at both ends
- Stainless shackle – needs to fit within the latch of the Quick Release
- Stainless D-ring
- Larger diameter buoyant rope
- 25ft slip rope
- Stainless spring-latch Quick Release with mounting hardware
INSTALLATION
Securely mount the Quick Release to the forward bottom frame of the ROV. This may be done using wire rope and fasteners or a hose clamp. See Figs. 1 & 2 .
Install and connect fully charged subsea batteries on the ROV.
Using the 35lb kettlebell, tie a small loop of paracord around its handle.
Attach the D-ring through the loop for use with the slip line.
Tie another larger loop through the GTR device long enough that the GTR won’t be forced against the kettlebell at any angle.
Using paracord or a heavy zip-tie, tie the free end of the GTR to the 8ft wire rope.
Install the shackle on the other end of the 8ft wire rope. This completes the rigging. See Fig. 2 .
See example of a recommended Quick Release in Fig. 3.
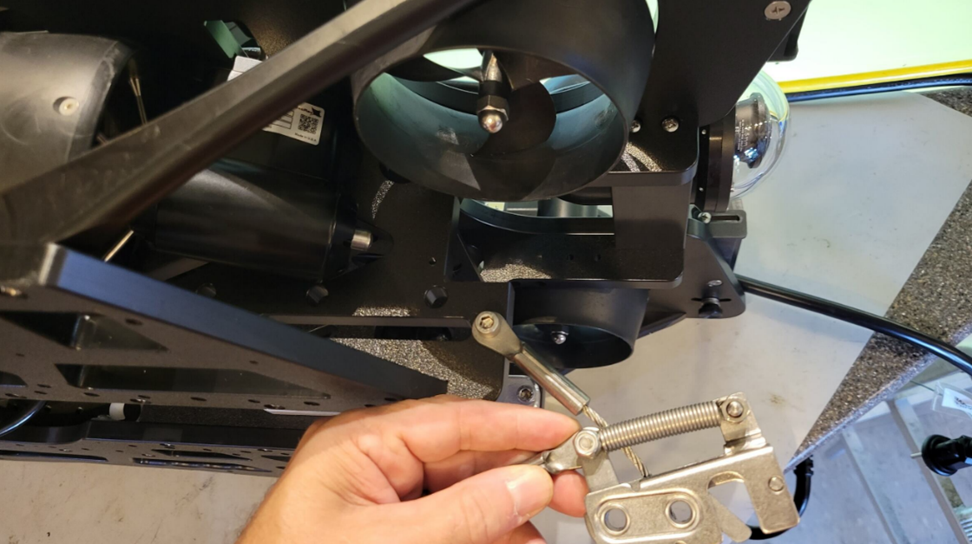
Fig. 1 – Quick Release installation
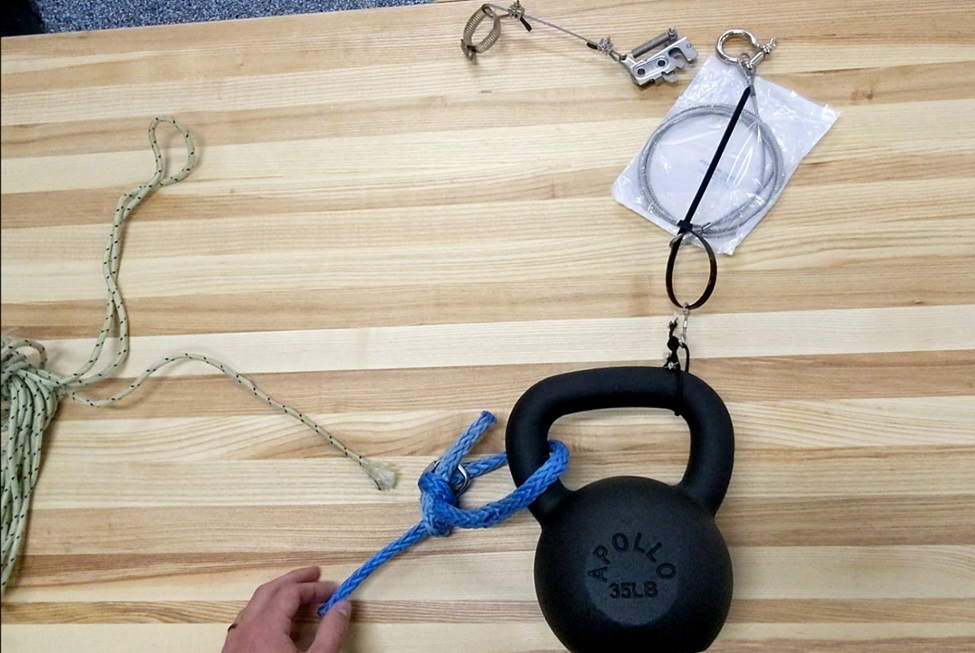
Fig. 2 – Deep Dive rigging
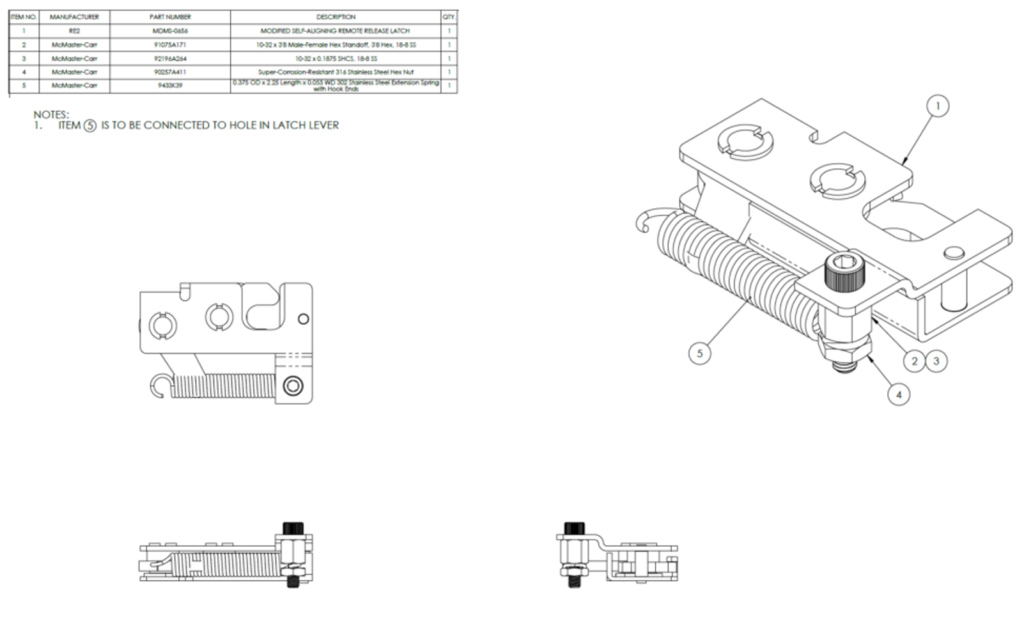
Fig. 3 – Quick Release drawing
DEPLOYMENT
Power up the ROV subsea batteries by inserting the power wand into the center circular opening in the front of one of the batteries. Fully insert the wand into the opening for approximately one second and remove. Two audible tones should be heard from the battery, followed closely by two audible tones from the other battery.
Wait several (5-10) seconds to confirm ROV power by illuminated LEDs on the Power and/or Communications modules. Both batteries are now turned on and providing power. Conduct a function test of all system components.
Check to confirm that the ROV strain relief is connected properly and does not allow any tension on the threaded tether connection at any angle.
Using a winch or davit, lift the ROV by the tether in preparation for connecting the rigging. Have a person stabilize the ROV as it is lifted.
Have another person put the slip rope through the D-ring on the weight and bring the weight to the ROV deployment area.
Have the person stabilizing the ROV grab the shackle at the end of the weight cable. Insert the shackle into the Quick Release and hold its latch closed, securing the shackle within.
With the slip line, lower the weight into the water. When the weight is fully lowered, confirm that the Quick Release is still holding the shackle.
Pull and remove the slip line from inside the D-ring. At this point the rigging should be suspended only from the ROV Quick Release.
Lower ROV into the water and release from winch/davit to start the dive.
Practice proper tether management to prevent entanglement and/or hazards. Have a tether manager guide and monitor the tether, and stop the dive if any tangles or knots need to be addressed.
The rigging should automatically be released by the Quick Release when it lands on the bottom. If not, try thrusting the ROV by heaving up/down or surging forward/reverse.
If the rigging cannot be released, wait for the GTR to corrode per specifications to release the ROV from the kettlebell.
During surfacing, either loosely flake the tether in a safe area or feed it freely back into the tether bag.
Recover the ROV using proper procedures.