Instructions
- Power On The Laptop
- Turn “Cortana” off by clicking the microphone in the lower left corner
- Region > United States > Yes
- Keyboard Layout > US > Yes
- Second Keyboard Layout > Skip
- Connect to your Wi-Fi of choice > Discoverable “No” > Next
- Legal > Accept
- Set up for Personal Use
- Offline Account
- Sign in with Microsoft > No
- Who’s PC > VideoRay
- No Password Click Next
- Select “No” to make Cortana your personal assistant
- Privacy Settings
- Location > Off
- Diagnostics > Basic
- Relevant Ads > Off
- Speech Recognition > Off
- Tailored Experiences > Off
- Support and Protection > Next
- Support and Protection > Uncheck Both Boxes > Next
- Open Control Panel > System & Security > System > Computer Name “Change Settings” > Change > Computer Name (Service Tag Located On the Bottom Of The Laptop) > Ok > Ok > Close > Restart Later
- Right click the Taskbar > Uncheck “Show People Button”
- Right Click OneDrive in the System Tray > Settings > Settings > Uncheck Start OneDrive on startup > Ok
- Click Start > Settings (Gear Icon) > Devices > Turn Off Bluetooth > Click The Back Arrow (Top Left Corner) > System > Notifications & Actions > Turn All 6 Notification Options Off Starting From the Bottom > Power & Sleep > Click Additional Power Settings
- Create A Power Plan
- Balanced > Plan Name (VideoRay) > Next > Set the settings according to the table below > Create
- On Battery and Plugged In:
- Turn off the display > Never > Never
- Put the computer to sleep > Never > Never
- Choose What Closing the Lid Does:
- Set the settings according to the table below > Save Changes
- On Battery and Plugged In:
- When I press the power button > Do Nothing > Do Nothing
- When I press the sleep button > Do Nothing > Do Nothing
- When I close the lid > Do Nothing > Do Nothing
- Right Click the Desktop and select Display Settings > Change Size of Text to 100%
- Retrieve a copy of the current build on a flash drive from support.
- Copy Folder (VideoRay) from your flash drive to File Explorer > Computer > OS: (C:)
- Click Start > Settings (Gear Icon) > Personalization > Lock Screen > Select “Picture” under Background drop down > Select Browse > Navigate to OS: (C:) > VideoRay > Backgrounds > Select 2015_Pro4_Desktop_v6 > Choose Picture.
- Navigate to File Explorer > This PC > OS: (C:) > VideoRay > Backgrounds > VrCockpit_background_2015 > Navigate back to the VideoRay Folder.
- From the VideoRay Folder > Installs > Blueview > Proviewer-4.3.1.9526 > Proviewer 4.3.1.9526 > Proviewer 4.3.1.9526 > Next > Check I Accept > Next > Next > Installs > Finish > Navigate back to the Installs Folder
- From the Installs Folder > Core_temp > Core-Temp-setup > yes > Next > I Accept > Next > Next > uncheck all options except “Additional Language Packs “ > Next > Install > Next > Uncheck View Readme and Language > Finish > Navigate back to the Installs Folder.
- From the Installs Folder > gps_diag > Setup > Yes > Next > Install > Uncheck Launch > Finish >navigate back to the Installs Folder.
- From the Installs Folder kcf > smart_tether_v6.3 > SmartTetherSetup > Next > Next > Next > Install > Yes > Uncheck Launch > Finish > Navigate back to the Installs Folder.
- From the Installs Folder > Logitech > LGS_5_10_127 > MSetup > Yes > Next > I Accept > Install > Next > Next > Uncheck View Readme > Finish > Done.
- Click Start > Settings (Gear Icon) > Updates & Security > Recovery > Advanced Startup “Restart Now” > Troubleshoot > Advanced Options > Startup Settings > Restart > When Prompted Press “F7” Disable Driver Signatures.
- Navigate to File Explorer > This PC > OS: (C:) > VideoRay > Installs > Lyyn > LyynHawkAdapterDriverSetup > Yes > Next > Finish > Navigate back to the Installs Folder. *Note upon successful installation you should see 2 green check marks under Driver Name on the Lyyn Hawk Serial Adapter Driver Installer. If you see 2 red “x”, repeat previous step.
- From the Installs Folder > prolific > USB Driver For Windows > PL2303_Prolific_DriverInstall_v1.14.0 > Yes > Next > Finish > Navigate back to the Installs Folder.
- From the Installs Folder > sealevel > driver > SS030703 > Next > I Accept > Next > Install > Yes > Ok > Uncheck Readme > Finish > Navigate back to the Installs Folder.
- From the Installs Folder > StarTech Capture Device > Windows > Setup > Next > Finish > Select No Restart Later > Finish > Navigate back to the Installs Folder.
- From the Installs Folder > teraterm > teraterm-4.88 > Yes > Next > I Accept > Next > Next > Next > Next > Next > Uncheck both shortcut options > Next Install > Finish > Navigate back to the Installs Folder.
- From the Installs Folder > tritech > Micron > Micron_3.1 > Right Click Setup > Properties > Compatibility > Check Run this Program in Compatibility for Windows 7 > Apply > Ok > Setup > Yes > Yes I Accept > Next > Next > Next > Finish > Navigate back to the Installs Folder.
- From the Installs Folder > VideoRay > Install > Setup > Install > Yes > Install > I Accept > Install > Finish > Yes > Check I have Read and Accept > Install >Finish > Next > Next > Next > Yes > Close.
- Setup_CockpitAccessory_KCF_Smarttether_1_0_0 > Next > Yes > Close > Navigate back to the Installs Folder.
- From the Install Folder > com0com > com0com > 64bit > setup_com0com_W7_x64_signed > Yes > Next > I agree > Uncheck (CNCA0 <-> CNCB0) and (COM# <-> COM#) > Next > Install > Next > Finish.
- Right Click setupc > Properties > Compatibility > Check Run this Program as Administrator > Apply > Ok.
- SetupDefaultPorts > Yes > Yes > Yes > Yes > Navigate back to the Installs Folder.
- From the Installs Folder > VideoRay > videoray_welcome > Right click videoray_welcome_pro_4_setup > Run as Administrator > Yes > Yes > Ok > Navigate back 1 folder.
- Pro_4_doc > videoray_doc_pro_4_mntmaster > Yes
- VideoRay_doc_pro_4 > Yes > Navigate back 1 Folder.
- Shortcuts > VideoRay > Desktop > Copy & Paste Device Manager, VideoRay Data, and VideoRay Pro 4 User Manual to the Desktop. > Navigate back to the Shortcuts Folder.
- From the Shortcuts Folder > VideoRay > Right click VideoRay Data > Copy > Open Start Menu > Right click vrCockpit > More > Open File Location > Paste VideoRay Data > Right click vrCockpit > Rename to VideoRay Cockpit > Close File Browser.
- Use Edge to download Google Chrome from https://www.google.com/chrome/browser/desktop/index.html > Download Chrome > uncheck Help make Google Chrome Better > Accept & Install > Run > Yes > Google Chrome Will Install. Click Start > Settings (Gear Icon) > Apps > Default Apps > Click Microsoft Edge under Web Brower > Click Google Chrome > click switch anyway > Close Edge.
- Use Google Chrome to download Google Earth from https://earth.google.com/download-earth.html > Agree and Download > Googleearthprosetup.exe > Yes > Close Google Earth.
- Use Google Chrome to download Adobe Reader from https://get.adobe.com/reader/ > uncheck optional offers > Install Now > click readerdc_enxa_cra_install > Yes > Uncheck Launch > Finish > Close Google Chrome.
- Remove all icons from the desktop except Recycle Bin, Disable_welcome, VideoRay Cockpit, Device Manager, VideoRay Data, and VideoRay Pro 4 User Manuel from the desktop by right clicking and selecting delete.
- Remove all pinned icons from the Taskbar except File Explorer
- Click Start > Right Click Windows Media Player > More > Pin to Taskbar > Open Windows Media Player > Recommended Settings . Finish > Close Windows Media Player.
- Using the photo below place the icons in the following positions.
- Restart the PC. Upon restart you should be greeted with the VideoRay Welcome Screen. If prompted Select Google Chrome to always open.
- Open Control Panel > Network and Internet > Network and Sharing Center > Change Adapter Settings > Right Click Local Area Connection > Properties > Double Click Internet Protocol Version 4 > Use the Following IP Address 192.168.1.3 > Subnet Mask 255.255.255.0 > Ok > Ok > Close Control Panel.
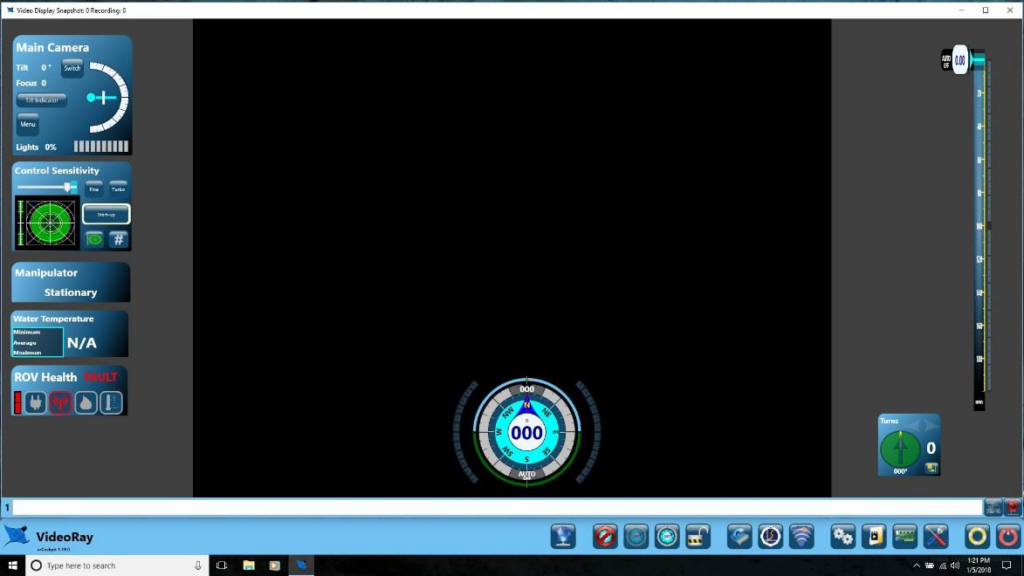
- From the Desktop Open VideoRay Cockpit and organize the layout to match the photo below:
- On the VideoRay Cockpit Toolbar Open Tritech Micron > Windows Security Alert Will Prompt > Check Both Boxes > Allow Access > Close Micron
- On the VideoRay Cockpit Toolbar Open Blueview Proviewer > Windows Security Alert Will Prompt > Check Both Boxes > Allow Access > Close Micron
- Close VideoRay Cockpit
- While holding down the “FN” key on the keyboard Press the “PrtScr” Button to turn Wi-Fi Off.
- Unpin All Apps from the Start Menu by right clicking and selecting unpin.
- Shutdown the Laptop and place all contents back in to the Box.
- On the Box Write the current build number, current date, and installers initials.