Forward / Reverse Control
The joystick is used to control the forward / reverse motion of the ROV.
Location
 |
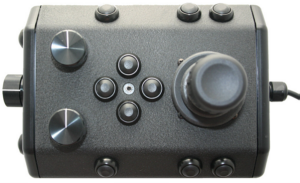
![]() The Joystick does not have a label.
The Joystick does not have a label.
Use
Displace the joystick forward (away from you) to move the ROV forward. Displace the joystick rearward (toward you) to move the ROV backward.
The greater the displacement from the center position, the faster the ROV will move or turn in that direction.
The joystick can be moved in any direction to simultaneously move forward or backward while turning or moving laterally.
![]() Do not run the horizontal thrusters in air for an extended period of time. Doing so may cause overheating and damage to the components.
Do not run the horizontal thrusters in air for an extended period of time. Doing so may cause overheating and damage to the components.
Lateral Control
The joystick is used to control the lateral motion of the ROV.
Location
 |
![]() The Joystick does not have a label.
The Joystick does not have a label.
Use
Displace the Joystick to the left to slide the ROV to its left. Displace the Joystick to the right to slide the ROV to its right.
The greater the displacement from the center position, the faster it will move or turn in that direction.
The joystick can be moved in any direction to simultaneously move laterally while moving forward/backward or turning.
![]() Do not run the horizontal thrusters in air for an extended period of time. Doing so may cause overheating and damage to the components.
Do not run the horizontal thrusters in air for an extended period of time. Doing so may cause overheating and damage to the components.
Yaw Control
The joystick is used to control the yaw motion of the ROV.
Location
 |
![]() The Joystick does not have a label.
The Joystick does not have a label.
Use
Rotate the Joystick to the left to turn (yaw) the ROV to its left. Rotate the Joystick to the right to turn (yaw) the ROV to its right.
Displace the Joystick to the left to slide the ROV to its left. Displace the Joystick to the right to slide the ROV to its right.
The greater the displacement from the center position, the faster it will move or turn in that direction.
The joystick can be moved in any direction to simultaneously turn while moving forward/backward or laterally.
![]() Do not run the horizontal thrusters in air for an extended period of time. Doing so may cause overheating and damage to the components.
Do not run the horizontal thrusters in air for an extended period of time. Doing so may cause overheating and damage to the components.
Depth Control
The Depth Control knob is used to make the ROV dive or surface by controlling the direction and amount of vertical thrust.
Knob Location and Label
 |
Use
Rotate the Depth Control knob forward (counterclockwise) to dive. The greater the rotation from the center position, the faster it will dive. Rotate the Depth Control knob backward (clockwise) to surface. The greater the rotation from the center position, the faster it will surface.
![]() Do not run the vertical thruster in air for an extended period of time. Doing so may cause overheating and damage to the components.
Do not run the vertical thruster in air for an extended period of time. Doing so may cause overheating and damage to the components.
![]() The Depth Control Knob has a center detent so that, by feel, you can tell when the knob is centered.
The Depth Control Knob has a center detent so that, by feel, you can tell when the knob is centered.
Pitch Up
The Pitch Up button increases the vertical angle of the vehicle in the upward direction.
Button Locations and Labels
 | Pitch Up |
Use
Press the Pitch Up button to pitch the nose of the vehicle up in 5 degree increments.
You can press the Pitch Down button to decrease the pitch, or press the Pitch Reset button to return to level.
Pitch Down
The Pitch Down button increases the vertical angle of the vehicle in the downward direction.
Button Locations and Labels
 | Pitch Down |
Use
Press the Pitch Down button to pitch the nose of the vehicle down in 5 degree increments.
You can press the Pitch Up button to increase the pitch, or press the Pitch Reset button to return to level.
Pitch / Roll Reset
The Pitch / Roll Reset button restores the vehicle to a level attitude.
Button Locations and Labels
 | Pitch Reset |
Use
Press the Pitch / Roll Reset button to restore the vehicle to a level attitude.
You can press the Pitch Up button to increase the pitch, or press the Pitch Down button to decrease the pitch.
Autos Off
The Autos Off button will disengage all Auto Modes.
Button Locations and Labels
 | Autos Off |  |
Use
Press the Autos Off button to disengage all auto modes and return the vehicle to manual flight control.
Lights Intensity
The Lights knob controls the intensity of the lights.
Control Location and Labels
 | Lights Intensity |
Use
Rotate the Lights Intensity knob counter clockwise to dim the Lights and clockwise to increase the intensity of the lights.
![]() Do not leave the lights on for an extended period of time. Doing so may cause overheating and damage to the components.
Do not leave the lights on for an extended period of time. Doing so may cause overheating and damage to the components.
Camera Tilt Up
The Camera Tilt Up button increases the vertical angle of the front camera in the upward direction.
Button Locations and Labels
 | Tilt Up |
Use
Press and hold the Tilt Up button to tilt the front camera up. Release the button when the camera has tilted to the desired setting or has reached the end of its range.
![]() You should not continue to hold either tilt button when the camera has reached the end of its tilt range.
You should not continue to hold either tilt button when the camera has reached the end of its tilt range.
Camera Tilt Down
The Camera Tilt Up button increases the vertical angle of the front camera in the downward direction.
Button Locations and Labels
 | Tilt Down |
Use
Press and hold the Tilt Down button to tilt the front camera down. Release the button when the camera has tilted to the desired setting or has reached the end of its range.
![]() You should not continue to hold either tilt button when the camera has reached the end of its tilt range.
You should not continue to hold either tilt button when the camera has reached the end of its tilt range.
Camera Focus In
The Camera Focus In button adjusts the focus of the front camera for near objects.
Button Location and Label
 | Focus In |
Use
Press and hold the Camera Focus In button to adjust the camera focus for near objects. Release the button when the camera has focused to the desired setting or has reached the end of its range.
Camera Focus Out
The Camera Focus Out button adjusts the focus of the front camera for far objects.
Button Location and Label
 | Focus Out |
Use
Press and hold the Camera Focus Out button to adjust the camera focus for far objects. Release the button when the camera has focused to the desired setting or has reached the end of its range.
Snapshot
The Snapshot button saves a still image from the active camera.
Button Location and Label
 |
Use
Press the Snapshot button to capture a still image from the active camera.
Snapshots are saved as .JPG formatted files in the gss_logs folder. They are automatically named by date and time. For more information, see the Snapshots section of the Operations Guide.
![]() You can capture a snapshot while recording video.
You can capture a snapshot while recording video.
Video Record
The Video Record button toggles the video record feature for the active camera.
Button Location and Label
 |
Use
Press the Video Record button to start recording a video from the active camera. Press the Video Record button again to stop recording a video from the active camera.
When the recording is active, the record icon button is illuminated green.
Video Recordings are saved as .MP4 formatted files in the gss_logs folder. They are automatically named by date and time. For more information, see the Video Recording section of the Operations Guide
Manipulator Open
The Manipulator Open button opens the jaws of the manipulator.
Button Locations and Labels
 | Manipulator Up |
Use
Press and hold the Manipulator Open button to open the jaws of the manipulator. Release the button when the manipulator jaws open the desired amount or have reached the end of their range.
![]() You should not continue to hold the Manipulator Open button when the jaws have reached the end of their range.
You should not continue to hold the Manipulator Open button when the jaws have reached the end of their range.
Manipulator Close
The Manipulator Close button closes the jaws of the manipulator.
Button Locations and Labels
 | Manipulator Close |
Use
Press and hold the Manipulator Close button to close the jaws of the manipulator. Release the button when the manipulator jaws close the desired amount or have reached the end of their range.
![]() You should not continue to hold the Manipulator Close button when the jaws have closed on an object or reached the end of their range. You can press and release the button a few times to tighten the jaws.
You should not continue to hold the Manipulator Close button when the jaws have closed on an object or reached the end of their range. You can press and release the button a few times to tighten the jaws.
Manipulator Rotate
The Manipulator Rotate knob rotates the jaws of the manipulator.
Button Locations and Labels
 | Manipulator Rotate |
Use
Rotate the Manipulator Rotate knob clockwise to rotate the manipulator jaws clockwise (when viewed from the rear of the manipulator). Rotate the Manipulator Rotate knob counterclockwise to rotate the manipulator jaws counterclockwise (when viewed from the rear of the manipulator). Center the Manipulator Rotate knob to stop the manipulator jaws from rotating.